Search layer
Over the years we have learned that search is not the same for everyone. Some people prefer to have it full screen, some with a smaller set of results, others with just a list of products. SniperFast Manager allows you to customize the look of the search to your taste, so as to provide the best experience for your customers.
Visual customization
The Layout tab lets you modify the whole search results panel. In the Preview image you can get an idea of the final result, with a brief explanatory video as well. The available options to you are:
- Template: select the panel type that you want to use to show the results. The Wide one will fill the part of screen that you want to, leaving the top of the website above the search bar visible. Full screen will instead cover the whole website. You can also add your website’s logo with the dedicated option (see below). Compact and Minimal will restrict the panel even more: with Minimal, side filter will be removed too.
- Results panel’s width: available for Wide template only. It lets you select how wide compared to the browser’s width the search results panel will appear, in percentage. It applies to desktop only. If you want that the results show up exactly under the search bar, select Search bar wide. This value is advisable only if you have a pretty wide search bar.
- Products per row: select how many products to show on a singol row. This option works on large templates only: below a certain width SniperFast will automatically adapt the visible products to preserve their correct visibility.
- Result height: depending on the order elements get loaded on your website (or even depending on the seller’s will), it might be necessary to raise or lower the results panel. If you star to type and the search results cover the search bar, set here a value of 100 or 200: adapt it until you find the proper value for your website.
Within Product card you can configure different parmeters that will change the appearance of every single product card. Some functionalities are available on Prestashop only, currently.
- Hide prices if customer is not logged in (PS only): this option hides prices to not logged in customers. It is useful for B2B websites mainly, where you might want to show prices for authorized users only.
- Load prices in realtime depending on customer’s group (PS only): this option works closely with the previous one. If enabled it will show prices for that specific customer, with their dedicated discounts.
- Show discount percentage: it adds a little label at the top right with the discount percentage.
- Show manufacturer’s name: if the manufacturer field is present within the file we receive, enabling this option you will be able to show its name between the SKU row and the product’s title.
- Show the add to cart button (PS, WooCommerce, Shopify): if a product is in stock and it doesn’t have any combination, the add to cart button will then be added next to the price.
NB: if you are using WooCommerce make sure to check the Enable AJAX add to cart buttons on archives in WooCommerce -> Settings -> Products menu as shown in the following picture to let this functionality work properly.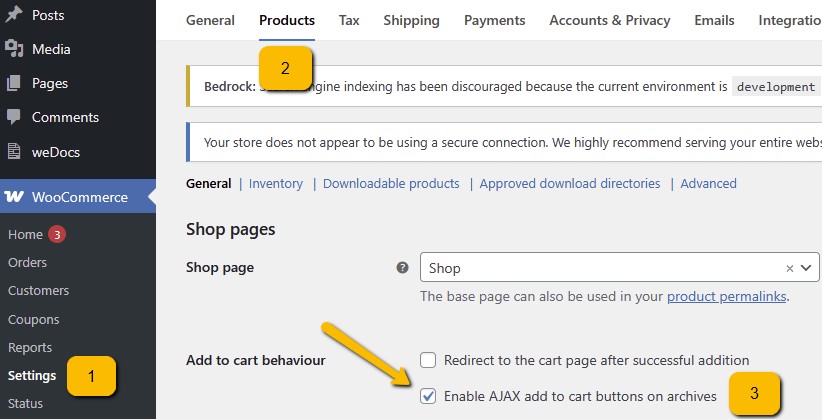
- Export variants as single products: by enabling this option, if a product contains combinations (for example size and color selection), each of them will be exported as a single product. In this way the customer will be able to view each possible version of the product and add it to the cart if the respective option is enabled.
- Group variants for attribute: this option is an extension of the combination explosion and lets you group them for a specific attribute. This will let you, for example, avoid having the same shoe replicated as many times as the number of sizes available (which would then be multiplied for the different colors), so to show it only N times, where N is the number of colors it is being sold in. The customer will not see Shoe Red 36, Shoe Red 37, Shoe Red 38, Shoe Blue 36, Shoe Blue 37, Shoe Blue 38, etc but only Shoe Red and Shoe Blue.
- Select attributes: this column offers the chance to add a priority to the different attributes you want to group products for. In order for this functionality to work you must perform a new export after enabling the Group variants for attribute option and saving. This will tell the module/plugin that all the attributes have to be added to the feed, so to be able to select them in this table. Wait for the file elaboration to be completed, then reload this page on SniperFast Manager and click on Add row to start configuring the grouping priority. If certain products have variants based on Color and Size, while others on Size only, then you will have to perform the following configuration: 1. Color, 2. Size. In this way Color will have the precedence over Size, if present, and only then we will group for Size.
Once the configuration is completed, save again and generate a second export to let the system apply the new configurations.
The Advanced configuration panel contains a text area reserved to people who have CSS knowledge: filling in the right codes you will be able to customize in detail the search aspect, setting for example colors closer to your company identity.
The Banner tab allows you to insert an image at the top of the search. This can be useful if you want to send your customers to specific pages of the site (for example to a promotion) or to a contact form to manage any of their needs. You can upload a dedicated image for the desktop (typically wider) and one for mobile (more compact). The Link field allows you to enter the destination to which the customer will be taken when clicking. The Alt parameter is used by search engines or in cases where the image should not be loaded (for example due to connectivity problems of a phone with poor coverage). Finally, the Open in a new window option lets you decide whether you want the customer to see the new page in the same tab in which they were browsing, or if one will be opened, so as not to lose the search results they got to.
Filters
Filters are one of the most important aspects for a search engine. They make it easier for the customer to find what they’re looking for by increasingly reduce the search area until they find exactly what they’re looking for. Think of a motorcycle website: by typing “suspension” I could find hundreds of results. By filtering by brand and model, I would limit the results to only products for my motorcycle. The same goes for clothing: having a size and color filter can greatly reduce the time it takes to find a dress that suits us.
The Filters tab contains the values that you have chosen to export to the feed. On Prestashop and WooCommerce you can select these parameters in the respective plugin; for other platforms they will instead have to be inserted in the file that is provided to us. Once you have chosen the parameters you are interested in, come to this tab to verify that they have been exported correctly: you can choose their sorting and additional features, which we will see shortly.
The Hide side filters option allows you to disable the filter column altogether: use this option if your file contains only product information or if you want to hide the column altogether.
Add a filter for available/not available products: enable this option to create an additional filter that allows you to filter for available and unavailable products. You can set a dedicated text in the respective fields. Once you enable this option, generate a new file: it will be active only starting from the NEXT export.
At the bottom of the page you will find the table with all the filters you have activated and their type. In addition to changing the sorting, the SniperFast Manager allows you to add additional features such as a search bar (useful if the filter has many values) and the choice of whether to show it already open or not. By doing so, you will be able to focus the customer’s attention on the parameters that you consider most useful for filtering the search results.
The Edit column also allows you to change the name of the filter: this option is useful if your file is extracted from a database or a management system and contains “technical” names (for example “Filter 1” or “Parameter variant 1”). In this way, you can give them a more readable name.
The Relevance tab is the second tab in this menu. Here you can choose the order in which to display the filters for sorting products, as well as change their name and possibly deactivate them. For example, you may want to remove the sorting by quantity since you have not entered this data in your file.
Nota bene: the parameter you choose as the first value will be the one that will determine the sorting of the results. If sorting by Relevance will lead to results whose score is established by SniperFast (making the most relevant ones appear first), setting Best sellers will always show up at the top of the list the products that meet this criterion, even if the relevance to the searched term is low (for example because it appears only once in the description).
Carousel
In this section you can create a selection of products to show your customers each time the search panel appears. In this way you will be able to add up to 10 terms and 16 products that you believe are highly interesting on your e-commerce.
Enable the carousel with the Show the carousel selector. If this option is disabled, all the others will be ignored and the search system will keep working in the traditional way.
Select products using: decide how to recognize your products, depending on how it is better for you. If your e-commerce platform shows numerical IDs for each product, select ID product. Should this information not be clearly visible or you prefer to lookup products with their code, then select Reference (SKU). Make sure that the codes are identical to the ones you added to the export file.
Show last viewed products carousel too: as the name suggests, this option lets you add a second row of results based on the customer’s navigation.
Use the Add term and the Add product buttons to respectively add the search terms to show to the customer and the products for the carousel. Terms will be clickable, so to show the respective search result.
Using the Auto fill button you will be able to automatically fill in the most searched terms and clicked products, based on the statistics data. They can be used as a good starting point to give you an idea on what to show in the panel.
The final result will be similar to the following one.
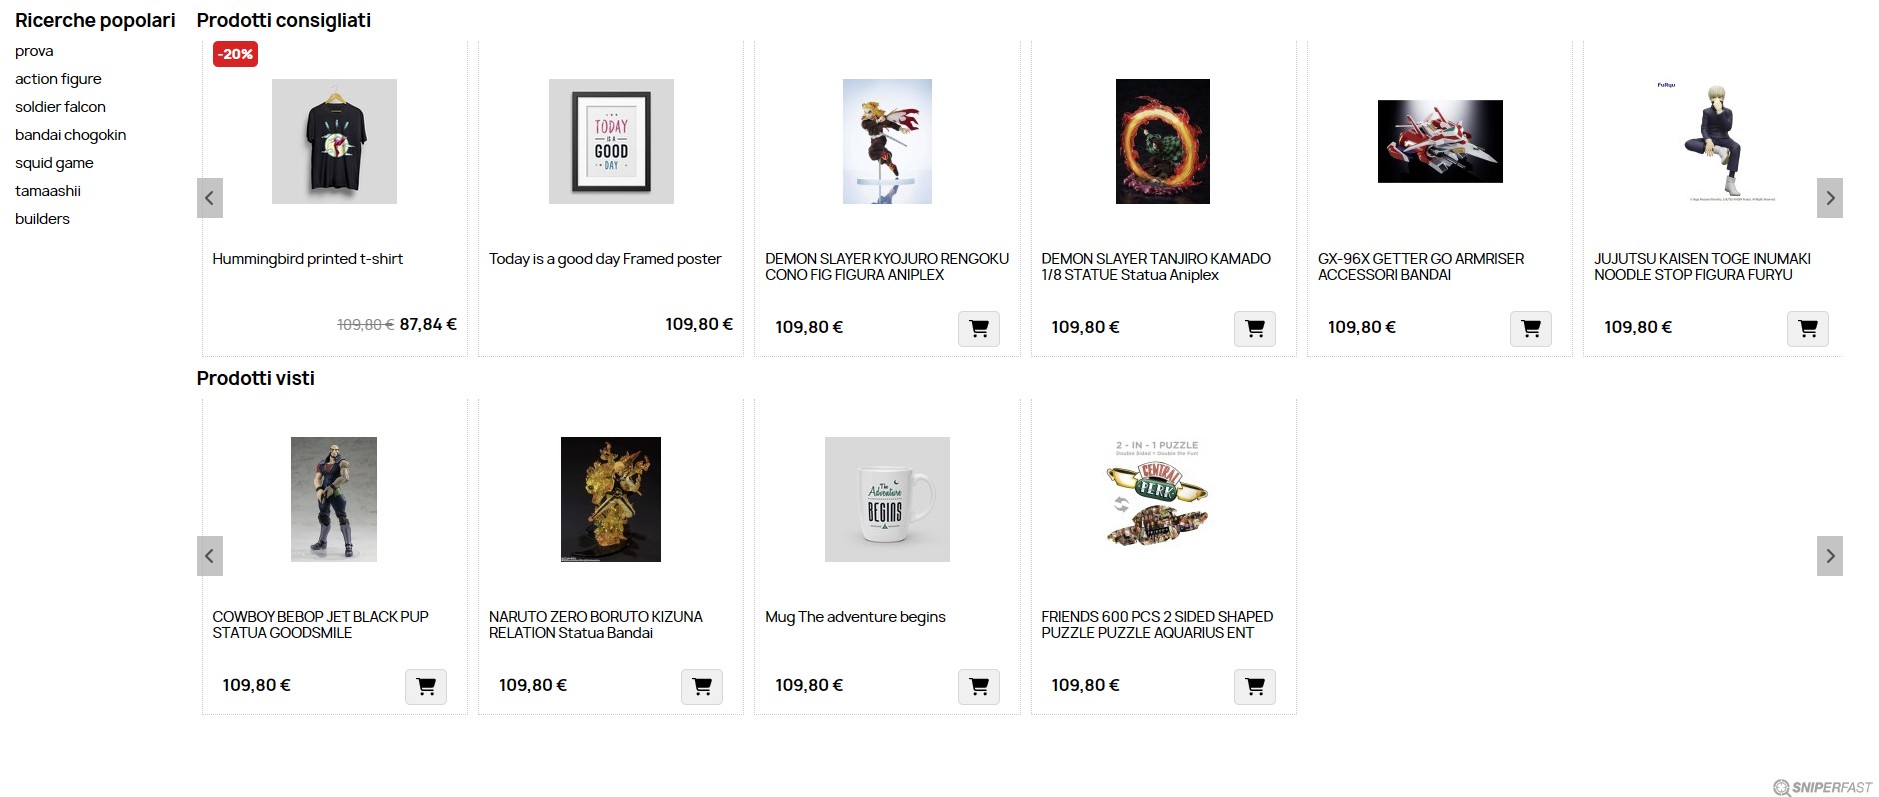
On mobile, instead, you will see the standard formatting: there will still be two blocks (Suggested products and Viewed products), but results will be shown from the top to the bottom.
The carousel won’t be shown in the compact and minimal template.