SniperFast module configuration for Prestashop
First installation or update
After downloading the module from the SniperFast Manager (during the onboarding phase or from the AI Search – Configuration – Module section) you will have to upload the zip file on your website, in the Improve – Modules – Module manager, clicking on the Upload a module button.
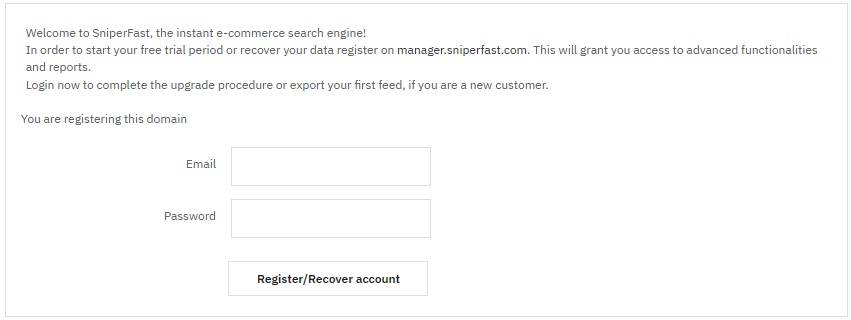
Once the installation procedure is over you will be able to enter the module: you will be presented with the login panel.
Fill in the e-mail and address you login on SniperFast Manager and click on Register/Recover account.
If you are updating from a version prior to 2.0 you will see the migration completed message. Your data have been migrated to the Manager and you will be handle them there, from now on. Click on Enable to complete the procedure and begin to use the most recent version of the module.

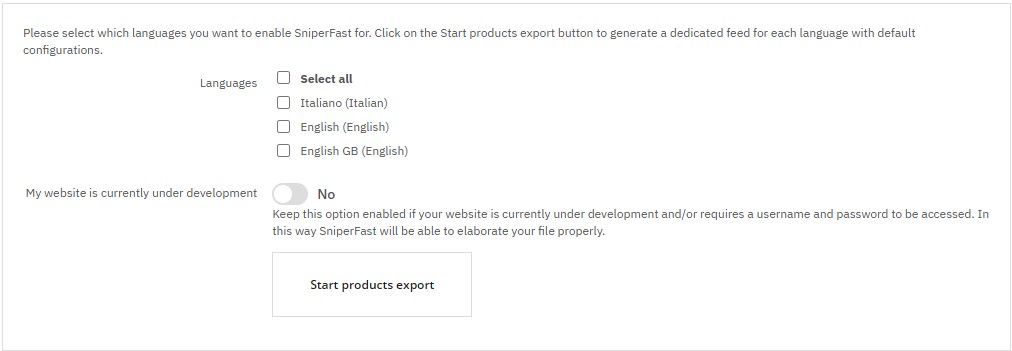
If instead you performed an installation from scratch you will see the products export panel. Select the languages for which you want to use SniperFast, then click on Start products export. Should your website still be in development or not reachable from the outside, enable the My website is currently under development option too, otherwise SniperFast will not be able to get the file you created.
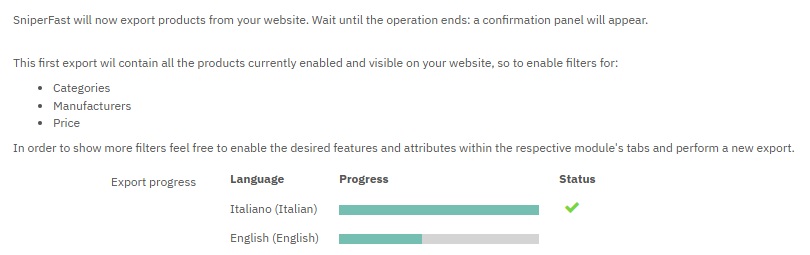
The first export will contained a predetermined set of data: in the search panel you will find filters for categories, manufacturers and price. Additional data can be enabled in a second moment.
In the next part you will be able to follow the export process procedure. Wait for all the operation to be completed and that the green mark appears under the Status column.
Once the files will be sent to our servers it will pass a few minutes before of their elaboration. You can follow their elaboration status in the next step.

Wait for the green mark to appear here as well: you will now see the same panel that you would see during the update procedure and you will finally be able to enable the search for your customers. Click on Try now! to check that everything is working fine.
Using the Go to module button you will have access to further configurations for the export process and functionalities.
Should the search not appear after placing the mouse inside of the search bar, go to the Manager to manually configure it.
Customize exported data
If you want to improve the search with additional side filters or, on the contrary, you would like to remove certain products from the results, take advantage of the different tabs of the module to customize the export as you prefer.
General tab
This section is subdivided into three parts.
GENERAL CONFIGURATION
- Export only products with stock: select Yes/No if you want the search to return only active and in stock products.
- Image format: it will set the image format that will be used in the product miniature used by the search engine. Unless you have a template with specific configurations, we advise to use home_default format or anyway one that does not exceed 450 x 450 px.
- Free shipping from: it lets you set the price from which a Free shipping label will appear in the product box within the search results.
- Export reviews: it lets you export data to show the score of your products. SniperFast is already integrated with the most common solutions that offer this service. Contact us reporting the system in use and we will provide you a dedicated solution to export the required data.
PRICES
- Currency: prices will be exported using this currency for the selected language.
- Remove VAT from prices: enable this option if you want to export prices VAT excluded.
DEDICATED PAGE
- Enable dedicated page for search results: by enabling this option you can use SniperFast as default for your website search result page, taking over the Prestashop standard search. Here you can also choose the name and the slug (the rewritten url link) for the page itself.
- Redirect to dedicated page on search bar button click: if the search bar contains a button that refers to the results page (typically the classic magnifying glass) it is possible to make the click redirect to the page created by the module . In this way the results will be consistent with what is shown on the starting page and the site will not receive any additional load as the SniperFast service will be used.
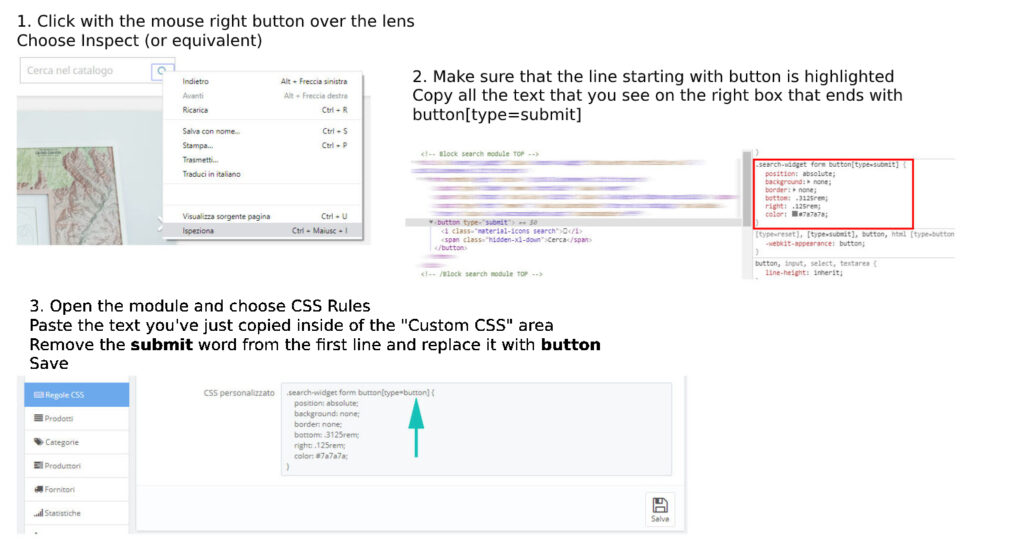
This option might lead to a change in the aspect of the button.
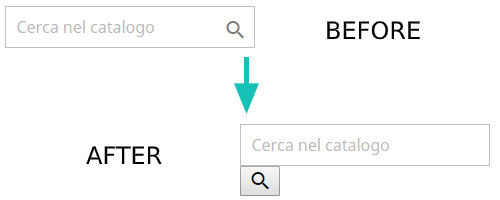
To solve this misalignment, temporarily disable this option and follow the steps described in the following image (click on it to enlarge it).
Features / Attributes
In these tabs you can select which features and attributes to export. In this way you can use them to create the side filters in the search results panel, so to let your customers find quicker the desired products (for example clicking on Color -> Green and Size -> M).
Make sure to perform a new export from the Export tab every time you perform modifications in these panels.
Products / Categories / Manufacturers / Suppliers
These four tabs all functions in a similar way. You will be able to massively enable/disable the respective element or one by one.
Keep in mind that a product is considered active for export only if it has the green mark in the Export column. This happens when its default category, its manufacturer and its supplier are enabled within the module. The product must also be enabled on the website, otherwise it will never be exported.
If a product has the red X because it doesn’t meet the previous requirements, you can still force its export enabling it within the Products tab. It still is mandatory that it is enabled on the website.
Landing pages
In this tab it is possible to create dedicated landing pages. Once created, the module will provide a link that you can place on your website to reach that search results page. The Add landing page button opens the dedicated configuration page. Using the Massive actions it is possible to massively enable or disable one or more landing pages. This operation will work on all the languages the landing page is configured for. Clicking on the green mark or on the red X under the Sync tab, instead, you will enable/disable the desired landing page for the currently selected language, so to be able to handle them in detail.
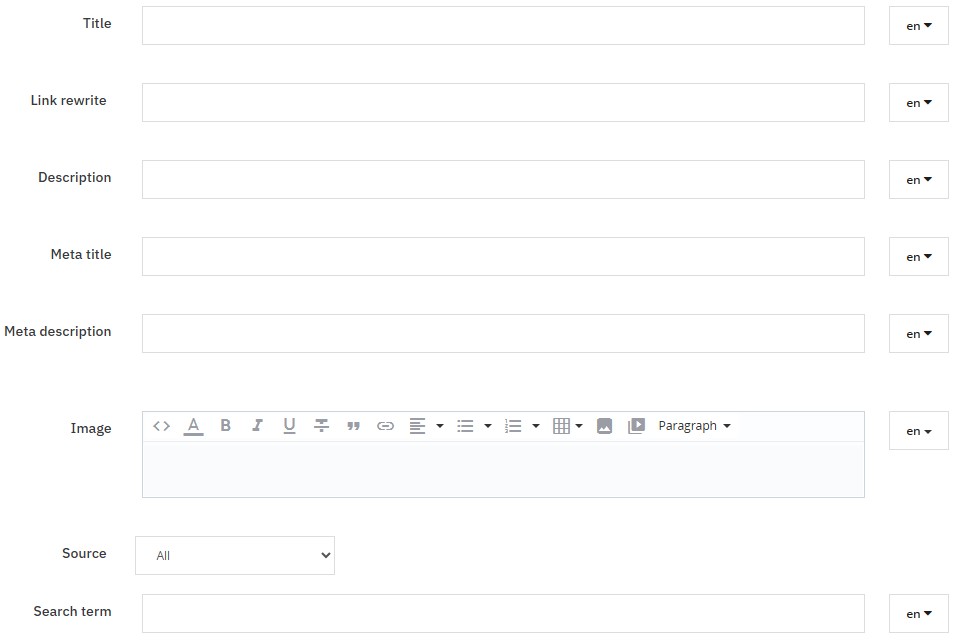
The configuration for the landing page contains the following fields.
- Title and Link rewrite: respectively the page title and the path that will be used to reach the landing page.
- Description: a textual field that allows to add a dedicated description for each page.
- Meta title/description: title and description for search engines.
- Image: in this panel it is possible to add an image to be shown at the top of the page.
- Source and Data source: the menu lets you select which criteria will be used to show data inside of the landing page. If you choose Category or Manufacturer a new input field will appeat. Fill in the Prestashop ID for the respective field.
- Search term: fill in the phrase or the work that will be used to filter results. It is possible for example to add the “Lego” category ID as data source and write “Harry Potter” here to filter results based on that search.
Export
From this tab you can export your feed to update the search results. The operation can be performed manually or in an auomatic way configuring a CRON on your website.
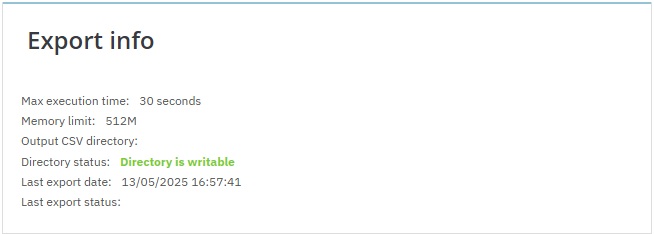
The Export info panel shows a brief summary of your server configuration: make sure that the destination folder is writable and that the export status reports OK.
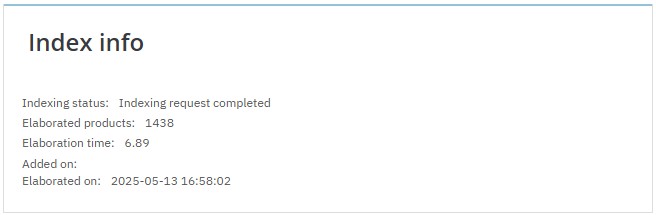
On the right, instead, you can find the Index info box, which summarizes the last file export status. You will find these information in the SniperFast Manager too, in the AI Search – Products indexing section: once you will configure a CRON you will be able to use the Manager to monitor the export process. Within the module you will find the number of products found within the file, the elaboration time and the time at which the operation ended. Keep in mind that the elaboration is not immediate: it will take a few minutes before that the file is read and elaborated, with times that depend on the size of the file itself.
The Export panel allows you to perform the actual update. By pressing the Export button, the operation will start in cycles, so as not to incur any limits and timeouts by the server.
Keep the My site is currently under development option active in case the site is still under construction or is not reachable from the outside: this will allow the module to use an alternative export method that will try to circumvent the problem.
Using the Download button you can save the file just generated on your computer. In case both export methods fail, this will allow you to upload the csv file to the SniperFast Manager and process it from there.
CRON
To keep your search results up to date, we recommend setting up a CRON on your server. A CRON is an automatic operation that runs at a pre-set time. Check with your hosting provider to find out how to install it correctly: some sites offer panels where you can simply copy the link provided by the module, others require the use of dedicated commands.
If you run the link via curl, make sure to put it in quotes, for example:
curl “cron_link”
This will ensure that all parameters are read correctly.
If a single CRON export cycle is not enough to generate the complete file, set as many CRONs as necessary. For example, if you have a max_execution_time of 10 minutes, but the file requires 15 minutes to be generated, then you can configure the CRONs as follows (the time is purely indicative):
10:00 first start
10:11 second start
The module also offers an advanced CRON mode: with this procedure, the CRONs following the first will be launched automatically if a single cycle is not enough. Check with your technician how to configure this mode.