SniperFast Prestashop general configuration
Once installed, if will be possible to configure and manage the module settings from the Catalog > SniperFast menu in your Prestashop backoffice.
Activate or recover your license
The configuration screen will show you a language selector that contains all your website’s active languages. Make sure you select the language you would like to configure SniperFast for before starting.
When you open the module for the first time or you select a not yet configured language, the module will show the welcome page with only one button: click on it to start the automatic registration process, which will end with the activation of a license for the selected language and it will unlock all the remaining configuration tabs.
The module is then subdivided into different tabs. In order to perform a quick setup, here are the mandatory operations to execute:
- Properly configure all the fields within the General tab (and optionally Features, Synonyms and filter products to export).
- Perform a first datafeed export from the Export tab.
- Verify the correct behavior of SniperFast service from your homepage searchbar.
- Setup a daily cronjob on your server to keep the search index up-to-date.
Module’s tabs
1. General
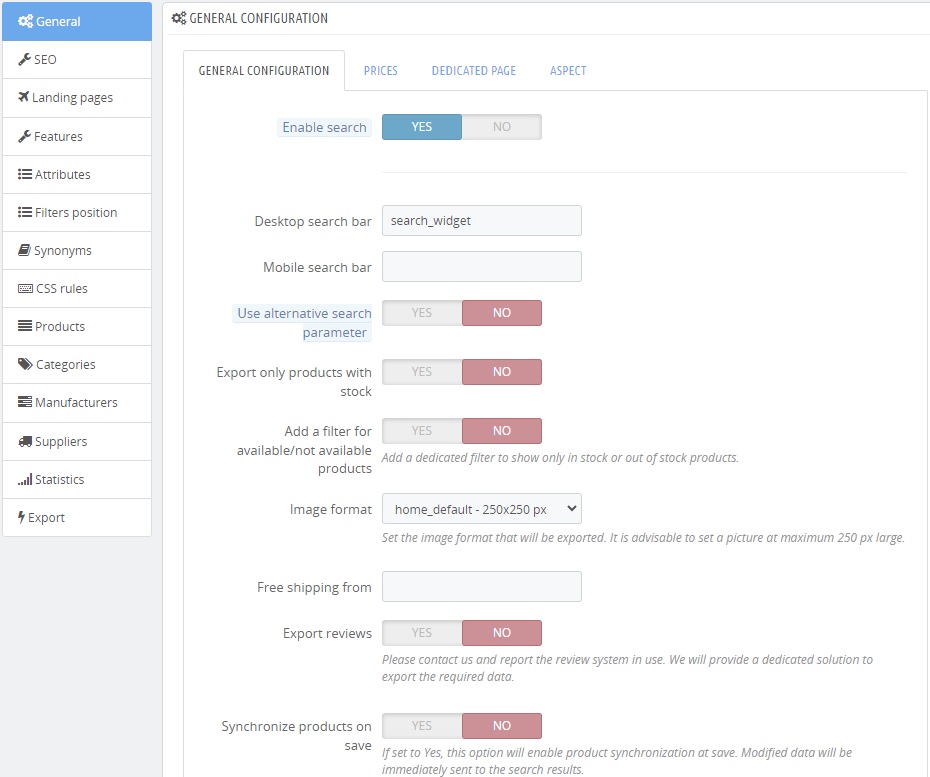
Enable search: you can enable or disable the search engine. Before of activating it, it is recommended to configure all the available option and generate a feed. Once its elaboration is complete (you can monitor its status withing the Export tab) you can then enable the search.
Desktop search bar: Insert here the name of the search bar in your website home page where you would like the SniperFast component to appear. Do not hesitate to get in touch with our technical support if you have trouble in finding that. Starting from release 1.5.5 the module will look for the search bar by itself; fill in this field only if the search bar is not dectected automatically.
Mobile search bar: If your template comes with a custom mobile theme / search bar, insert here the dedicated <div>, otherwise leave this field empty and SniperFast will adapt itself accordingly.
Use alternative search parameter: SniperFast writes the search links using the “q” character in the browser bar. On certain websites this can cause a conflict with some faceted search modules. Enable this option to solve the problem and avoid interferences between the two systems.
Export only products with stock: Select YES / NO if you would like SniperFast to only return active / in stock products.
Add a filter for available/not available products: add a dedicated filter that lets you show only available or not available products. Enabling this option you will have three additional fields where you can fill in your own text to show in the search panel.
Image format: Detemine the image format to use in products thumbnails used by SniperFast. Unless your theme requires very specific settings, we suggest you to use the “home_default” format. In general it is advisable to avoid formats bigger than 450 x 450 px.
Free shipping from: In this field you can optionally specify a minimum price value which will cause the search engine to show a “Free shipping” banner inside the product square in frontend.
Export reviews: By enabling this field you will export data needed to show “reviews” in your products. Sniperfast already provides support for a majority of review services. Contact us by reporting your system and we will check with you for a solution to export those data.
Synchronize products on save: By enabling this option , your product will be immediatly added / updated on search engine upon Prestashop save.
Prices
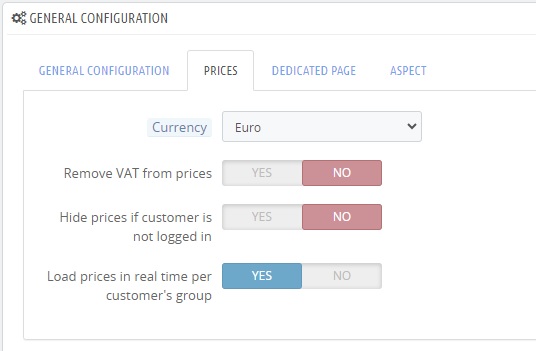
Currency: prices will be exported in this currency for the selected language.
Remove VAT from prices: enable this option if you want to export prices without VAT.
Hide prices if customer is not logged in: if enabled, this option will hide products’ price and price filter on the side column for not logged in customers.
Load prices in real time per customer’s group: enabling this oprtion, when a customer is logged they will see prices dedicated to its customer’s group. Prices will be read in real time from the website. This option is suggested for those who work in a B2B environment, where each customer might have dedicated discounts.
Dedicated page
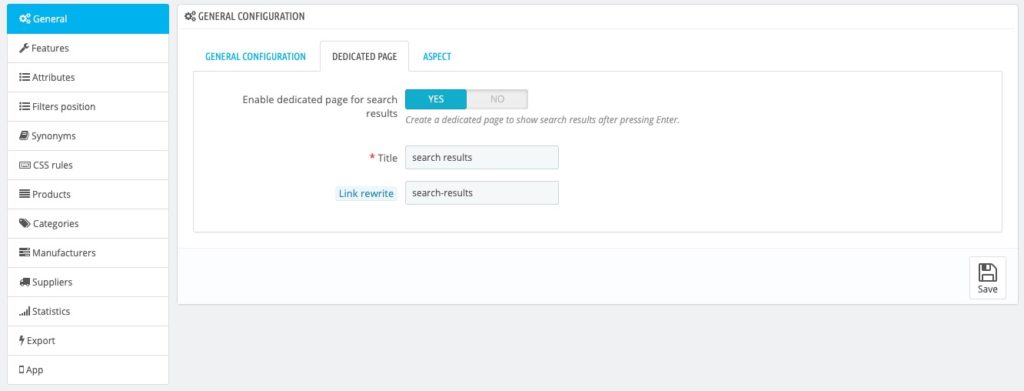
Enable dedicated page for search results: By enabling this option you can use SniperFast as default for your website search result page, that will take over the Prestashop standard search. Here you can also choose the name and the slug (the rewritten url link) for the page itself.
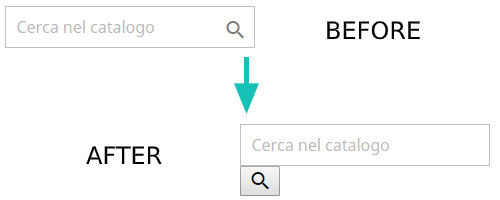
Redirect to the page dedicated to clicking on the button of the search bar: if the search bar contains a button that refers to the results page (typically the classic magnifying glass) it is possible to make the click redirect to the page created by the module . In this way the results will be consistent with what is shown on the starting page and the site will not receive any additional load as the SniperFast service will be used.
This option might lead to a change in the aspect of the button.
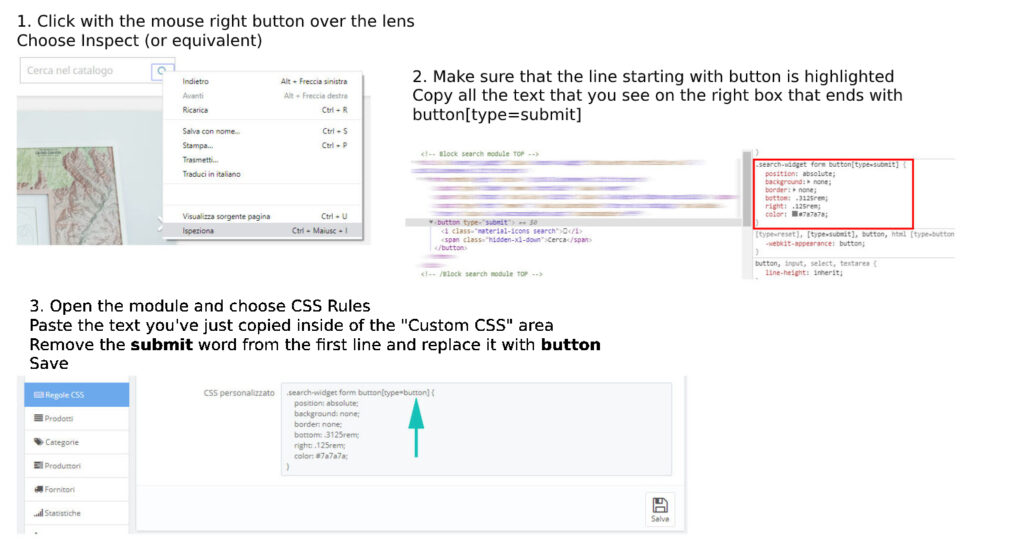
To solve this mismatch, temporarily disable the option and follow the steps described in the following image (click on it to enlarge it).
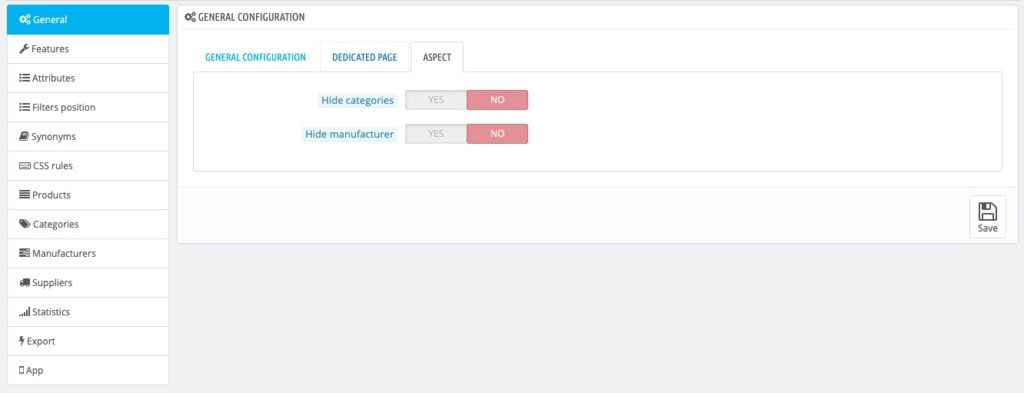
Aspect
(Only for Prestashop 1.6 ) : In the “General” tab you will also find some useful informations related to your Prestashop search configuration, especially you will see the status of the “Ajax Search” (to be disabled), of the instant search (to be disabled too) and of the “Move javascript to the end” (to be enabled for improved performance). Those configurations can be fine-tuned in the “Preferences => Search” and “Advanced Parameters => Performance” in your backoffice.
Hide categories: activate this option to hide the category filter in the search results pane.
Hide manufacturers: activate this option to hide the category filter in the search results pane.
Results panel width: select the search results panel width on desktop. The Default value is different depending on the chosen template.
Results panel alignment: decide whether you want to align search results on the left, on the right or in the middle. This option is useful when you select a size which is narrower than the page and you want to align the results to one side of the search bar.
Template: there are three different options available.
- Wide: results will be shown as a grid, where each element is aligned vertically.
- Compact: results will be shown horizontally. The width is lower than the wide format and you will still have manufacturers and categories filters, so to allow the customer to filter the search results.
- Minimal: results will be shown horizontally in a list with a minimalist look. You can configure the result panel width to match your search bar’s.
Advanced
You can leave these fields empty. Prestalia will give you the data to fill in if needed, usually when customizations to the search functionalities are requested and need dedicated files to be loaded at front office.
2. SEO
Enable dedicated page for most searched terms: this option allows to create a CMS page containing the most searched terms. Each term will redirect to the respective search page. In order for this option to work you must have previously created a dedicated page within the General tab.
Title: the CMS page title which contains the most searched terms.
Link rewrite: the url where the page will be visible. We suggest to leave the value automatically generated by the module.
Dedicated page meta title/description: the dedicated page (created in the General tab) will have the meta title and meta description added here, so to be properly indexed by the search engines. It is possible to add the [[search_term]] bookmark within the title and/or the description. That code will then be replaced with the user search term. I.e.: writing “Look for [[search_term]] on mywebsite.com!”, if one of the most searched terms is “Alfa Romeo”, then the result will be “Look for Alfa Romeo on mywebsite.com!”.
This means that, when a search engine will follow the links present in the CMS page with the most searched terms, that link will be indexed with a unique title and description.
3. Landing pages
In this tab it is possible to create dedicated landing pages. Once created, the module will provide a link that you can place on your website to reach that search results page. The Add landing page button opens the dedicated configuration page. Using the Massive actions it is possible to massively enabled or disable one or more landing pages. This operation will work on all the languages the landing page is configured for. Clicking on the green mark or on the red X under the Sync tab, instead, you will enable/disable the desired landing page for the currently selected language, so to be able to handle them in detail.

The configuration for the landing page contains the followinf fields.
- Title and Link rewrite: respectively the page title and the path that will be used to reach the landing page.
- Description: a textual field that allows to add a dedicated description for each page.
- Meta title/description: title and description for search engines.
- Image: in this panel it is possible to add an image to be shown at the top of the page.
- Source and Data source: the menu lets you select which criteria will be used to show data inside of the landing page. If you choose Category or Manufacturer a new input field will appeat. Fill in the Prestashop ID for the respective field.
- Search term: fill in the phrase or the work that will be used to filter results. It is possible for example to add the “Lego” category ID as data source and write “Harry Potter” here to filter results based on that search.
4. Features
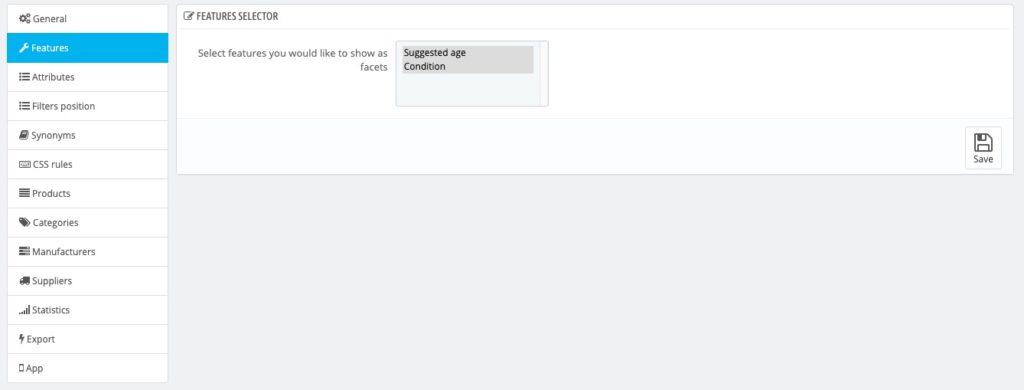
From this tab you can select the features you want to show as search filters in the left menu in SniperFast. Features will be processed by the Sniperfast engine and shown as a list with checkboxes or numeric sliders based on their values.
If changes are made in this section it is necessary to export a new search index from the “Export” tab
5. Attributes and Filters’ options
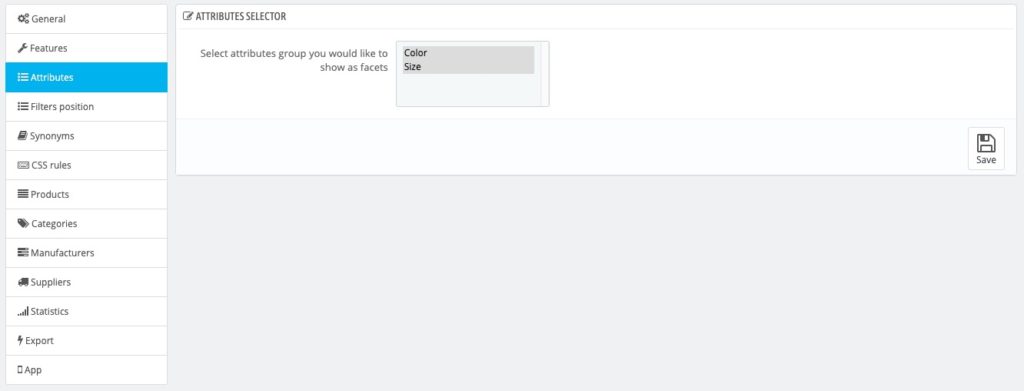
From this tab you can select the attributes group you want to show as search filters in the left menu in SniperFast. Features will be showed as checkbox in the frontend search engine filter.
If changes are made in this section it is necessary to export a new search index from the “Export” tab.
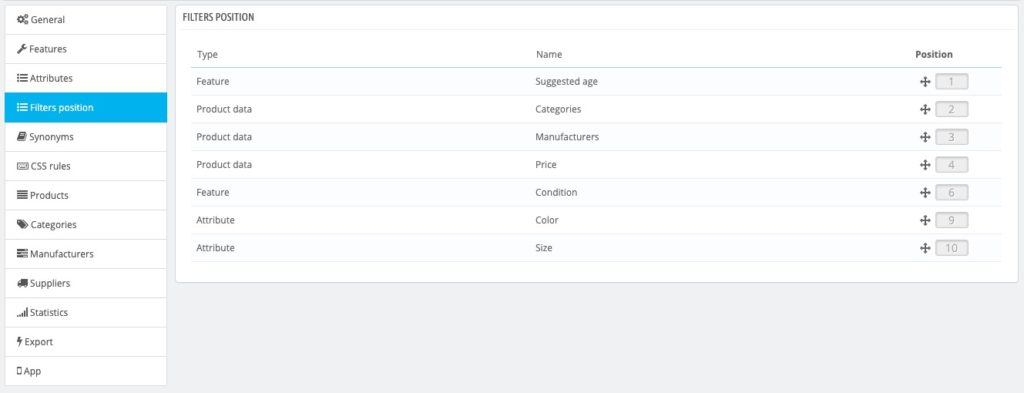
The “Filters’ Options” tab allows you to change the order of the advanced search filters. Just move them and the new setting will be saved automatically.
From version 2.0 two new columns have now been added: Search bar and Is open. Enabling the first option, a dedicated search bar will appear below the respective filter, within the search results panel: this will let the customer filter results for that specific element, so to easily find the value they’re looking for. The latter, instead, will let you decide whether to show the filter as open or closed when the search panel is loaded: we suggest to leave open the main filter, those that will help the customer in better finding the result, while closing the ones with many values.
The Relevance filters’ position column will let you move those fields within the search panel. The field chosen as position 1 will be the one results will be filtered for, if the user does not modify it.
6. Synonyms
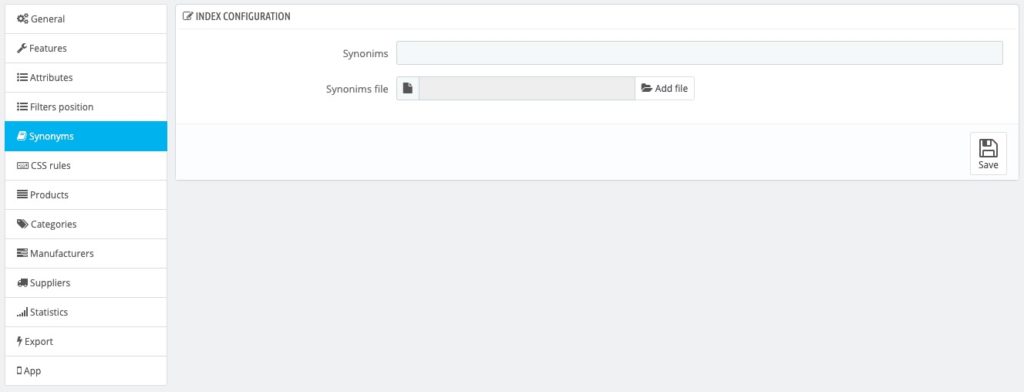
Optionally you can specify some synonims that should be consided when performing a searh query – They should be comma separated, ie:
t-max, tmax, t max
computer, calculator, pc
etc.
When the user writes a word in the search (example “computer”) the SniperFast system will extend the search to all the words entered as synonym, giving priority of results first to the corresponding one (“computer”), then to subsequent ones (“calculator “,”computer”).
The synonyms can be entered directly on the screen (from the “TEXT” tab) or by uploading a file (via the “FILE” tab).
At the end of the upload it will be necessary to export a new data file (from the EXPORT menu) so that they are processed and made available in the search.
7. CSS Rules and banners
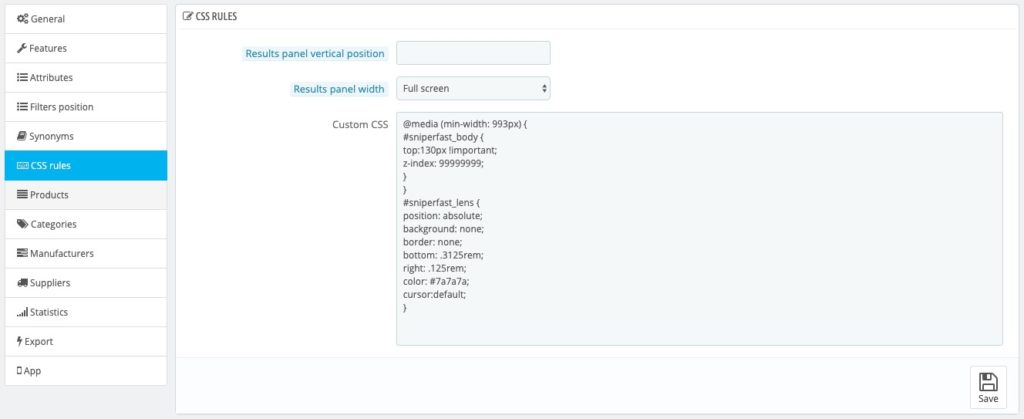
In this tab it is possible to add some custom CSS rules, related to the frontend search component visualization style.
Results panel vertical position: by default the search panel is supposed to appear just below the search bar. If you want to move its position higher or lower within the page, then you can use this setting. The higher the number filled in, the lower the search results’ panel will appear inside of the page.
Custom CSS: in this panel it is possible to customize each aspect of the results panel appearance, if you know how to write CSS code. You will be able to customise both colors and the container.
Moreover, if your website has a sticky menu (i.e. a top menu that remains sticky as long as you scroll down the page), it is advisable to add the following code inside of the text area:
@media (min-width: 993px) {#sniperfast_body {position: fixed !important;}}
In this way the search results will remain locked under the bar, avoiding them to disappear while the customer is moving towards the bottom of the page. The 993 value is fine for most of the templates. Should yours enter the mobile mode at a different width, then replace it with the proper value.
Products results’ banner
Desktop / mobile banner: click on Add files to upload a banner that will appear above the search results on desktop and on mobile. Images must have one of the following formats: jpg, jpeg or png.
NB: banners will show only in the search panel that appears after performing a search in the website’s search bar, not in the landing page or search results page.
Delete desktop / mobile banners: if enabled, this option will delete the respective banner when saving.
Link: if present, when the customer will click on the banner they will be redirected to the link filled in this field.
Alt paremeter: fill in an alternative text, useful for SEO. It will be added to the code generated by the module, but it won’t show on screen.
Open link in another window: as per the title, if enabled, when the customer clicks on the banner, a new browser’s window will open, so that they won’t lose the previous one with the search results.
8. Products
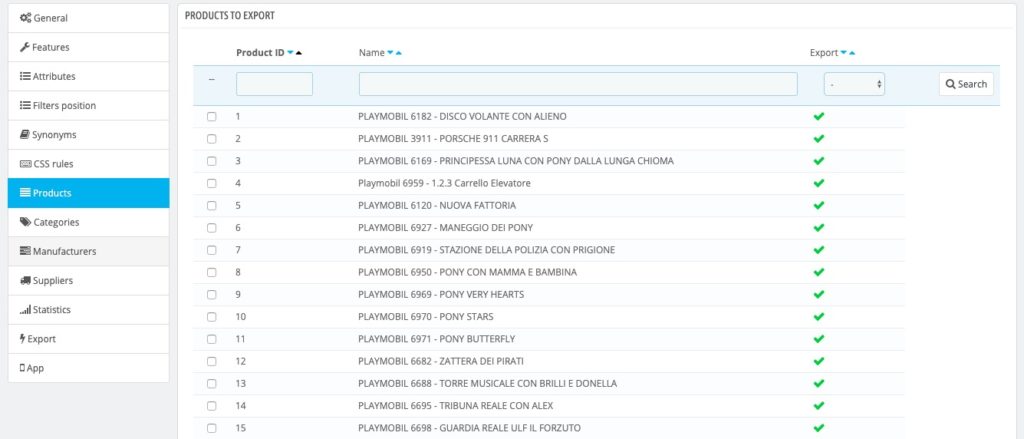
In this tab it is possible to exclude certain products from the search engine. Products will be excluded during data export, therefore a new index will have to be regenerated in case of changes.
9. Categories
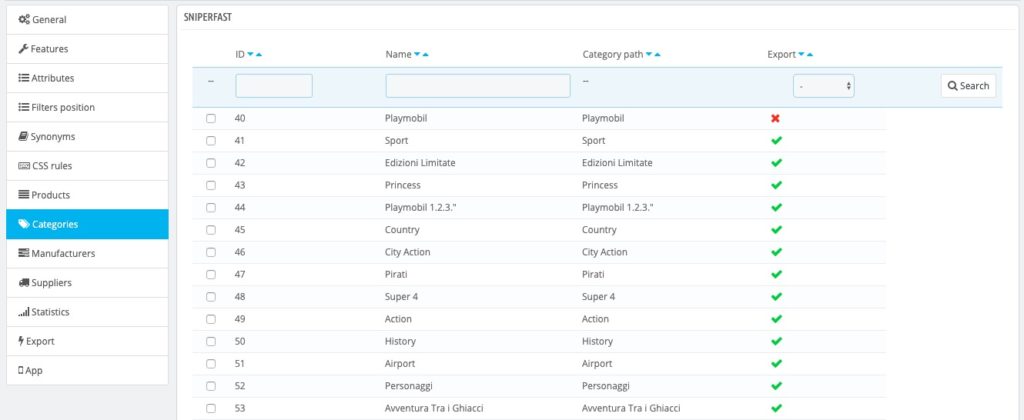
In this tab you can exclude products belonging to certain categories from the search engine. The products will be detected considering the default category and excluded during data export, therefore a new index will have to be regenerated in case of changes
10. Manufacturers
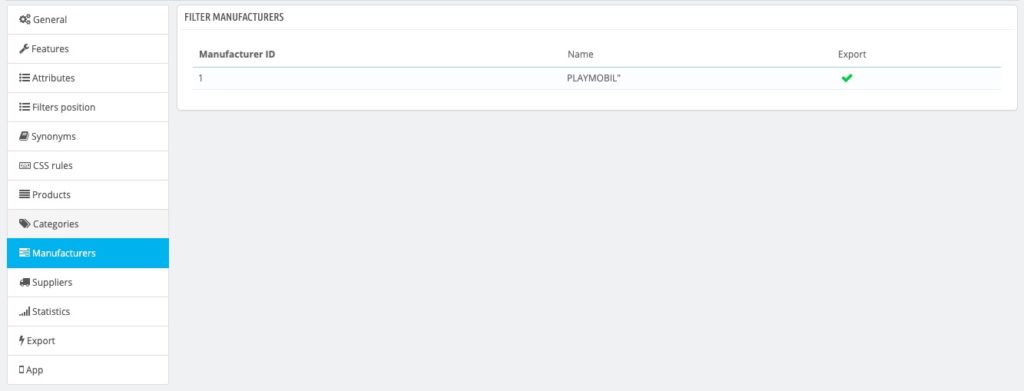
In this tab it is possible to exclude products belonging to selected manufacturers from the search engine. Products will be excluded during data export, therefore a new index will have to be regenerated in case of changes.
11. Suppliers
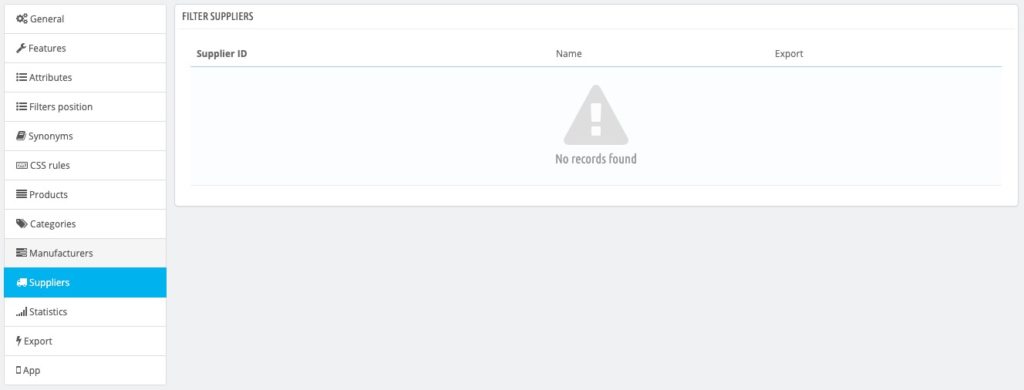
In this tab it is possible to exclude products belonging to selected suppliers from the search engine. Products will be excluded during data export, therefore a new index will have to be regenerated in case of changes.
12. Statistics
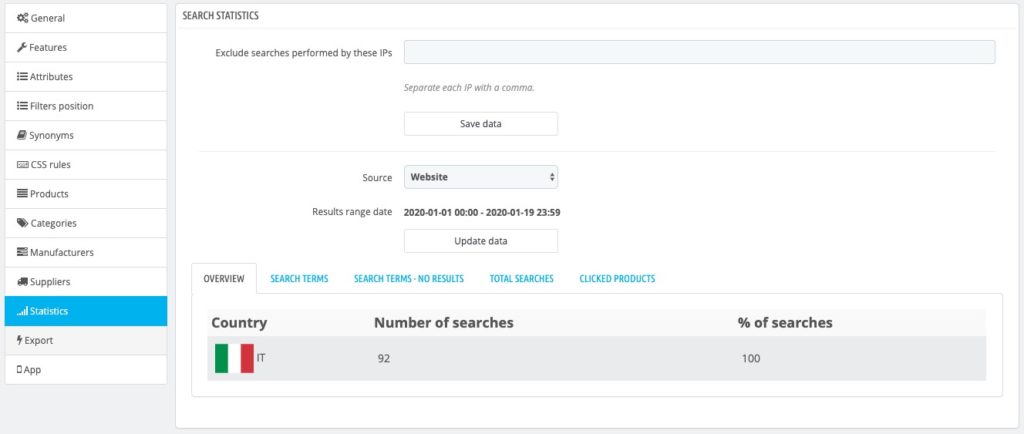
This tab allows you to view statistics related to your customers search. Data will be updated on daily basis and could be filtered by starting date and country (obtained by geolocation).
It is also possible to exclude one ore more IPs from search results, by inserting them on the box on the top of the page.
Tab is divided in several panels:
GENERAL: Will show you the number of searchs and percentage relatd to the total requests of the current month
SEARCH TERMS: Will show you the most relevant search terms used by your customers, that returned at least one result.
SEARCH TERMS – NO RESULTS: Will show you the most relevant search terms used by your customers, that returned no results.
TOTAL SEARCHES: Will show you the total search numbers, splitted by day.
TOP CLICKED PRODUCTS: Will show you the most clicked products by your customers. Since this functionality had been included from module version 1.2.5, you will need to wait at least 24 hrs after the update in order
to receive first statistics.
13. Export
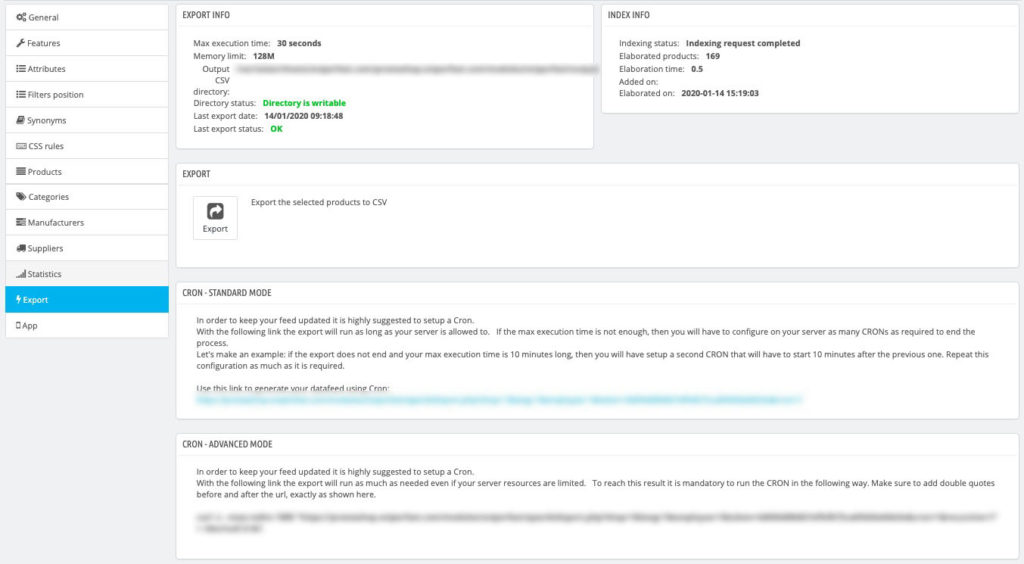
From this tab it is possible to export the data necessary for SniperFast to index the search. The export can be launched manually (via the “Export” button on the page) or via cron (with the link indicated in the “Cron” tab).
We recommend setting a daily cron to keep the list of indexed products updated automatically.
The module offers two types of CRON:
- standard: in this mode the export starts and continues until the server limits are reached. If your machine is able to run an operation for 60 seconds, then the CRON will run for that time, then stop. If this period of time is not sufficient to complete the export, a red notice will appear on the form next to “Last export status”. It will therefore be necessary to set as many CRONs on the server as needed to complete the export successfully. In the example provided, the second CRON should be set 1 minute after the first.
- advanced: this mode is reserved for expert users, who have access to the configuration parameters of their server. Using the command provided by the module, it is possible to make sure that the export takes place in a single operation, regardless of the processing time limits of your site.
In this screen it is also possible to obtain statistical data relating to the performance of your server (“Export Info” tab) and the last indexing carried out (Index Info).
14. Utilities
If you installed SniperFast on a development website with a temprary url and you are now moving it to production without reinstalling it from scratch, the module will keep its original access data. This means that, should you need to reinstall the module in the future, statistics gathered from the first account will be lost, not being linked to the new domain.
To avoid this, once the website will reach production stage, you can click on Convert index: the test one will be disabled and it will be converted in the new one, without having to modify the database or to reinstall everything which would force you to configure the module again.